There are dozens of blog posts and instructions on how to remove computer objects from Configuration if the corresponding AD object no longer exists. I thought I would put my own spin on the idea since I haven’t seen it before. Many of the guides rely on matching the object’s names to each other. The problem you can run into with this method is reusing computer names. You can delete a computer in AD and add a new one with the same computer name. When Configuration Manager runs its next AD sync it will find the new AD computer object and add it to the inventory. Now Configuration Manager has two computer objects with the same name. As an administrator this can get confusing and if you try to clean up Configuration Manager based on name matching the old object won’t get removed.
Rather than match the objects on name you can use something more unique, like the SID. Configuration Manager capture the AD objects SID during the sync so you can use that to match objects and delete those that no longer exist. You can look at the code below or in github.
$SiteCode = "<YOUR SITE CODE>" # Site code
$ProviderMachineName = "<YOUR CM SERVER>" # SMS Provider machine name

#Customizations
$initParams = @{}

#Import the ConfigurationManager.psd1 module
if((Get-Module ConfigurationManager) -eq $null) {
Import-Module "$($ENV:SMS_ADMIN_UI_PATH)..\ConfigurationManager.psd1" @initParams
}

#Connect to the site's drive if it is not already present
if((Get-PSDrive -Name $SiteCode -PSProvider CMSite -ErrorAction SilentlyContinue) -eq $null) {
New-PSDrive -Name $SiteCode -PSProvider CMSite -Root $ProviderMachineName @initParams
}

#Set the current location to be the site code.
Set-Location "$($SiteCode):\" @initParams

#As far as I can tell, this is the only way to get the SID for a computer object in SCCM. The prebuilt cmdlets will not return SID
$devices = Get-WmiObject -ComputerName $ProviderMachineName -Namespace "ROOT\SMS\Site_$SiteCode" -Class SMS_R_System
foreach ($device in $devices) {
try {
$sid = new-object System.Security.Principal.SecurityIdentifier($device.SID)
} catch {}
$ADcomputer = Get-ADComputer -Filter {SID -eq $sid} if ($ADcomputer) { #nothing } else { Remove-CMResource -ResourceId $device.ResourceId -Force } Remove-Variable sid Remove-Variable ADcomputer
}
Simple as that. Hope you found this article helpful. And play around with PowerShell. There is near infinite capabilities of the language.
I recently decided to replace the electrolytic capacitors in the power supply of my original PlayStation. This is preventative maintenance because over time the fluid from the capacitors can leak out and cause corrosion to solder pads and traces on PCBs. My Life in Gaming’s “Analog Frontiers Part 2” video details of the risk and challenges around keeping older hardware from destroying itself.
Where is a good place to find capacitors? Amazon, eBay, Mouser, Digikey, and Newark are all common places to purchase electronic components. But Console5.com has made a name for itself by selling complete capacitor kits for hundreds of consoles, computers, arcade boards, and more. They have become the first place to stop when looking for capacitors for older consoles.
In my case, I needed a kit for a ETXNY209A1B power supply from an SCPH-7501 model PlayStation. This PSU had the following electrolytic capacitors:
Identification
Capacitance
Voltage
C003
120 μF
200V
C102
560 μF
25V
C103
560 μF
25V
C104
220 μF
25V
C105
220 μF
25V
Console5 did not have a specific kit for my power supply, but the detailed information in their wiki allowed me to find a kit that would work. The ETXNY169A1B PSU kit had the same capacitors plus an extra 1 μF capacitor my PSU did not need. With capacitors in hand, the next step was to heat the soldering iron and remove the old caps. More on that later.
If you are wanting to get into racing on Gran Turismo Sport using a wheel, there is one important thing you need to know. GT Sport does not allow the player to adjust the wheels’ maximum rotation range like many other games. This isn’t a big issue in earlier versions of Gran Turismo if you use the popular Logitech G25 and G27 Driving Force™️ wheels. They have undocumented button combinations to manually set the maximum rotation.
Gran Turismo Sport is different. The game is on PlayStation 4 and doesn’t support Logitech’s older wheels. The G29 Driving Force™️ is Logitech’s replacement and, sadly, doesn’t have the button combinations its older siblings have. If you use the G29 to place GT Sport you will be stuck using 900 degrees of rotation in many of the cars.
Thankfully, there is another wheel that solves this problem. Thrustmaster, the company behind detailed flight simulator controls, sells the T300 RS race wheel for PS4 owners. While the wheel features 1080 degrees of rotation, it also has a MODE button. Holding the button and pressing left or right on the D-pad allows you to change the max rotation from 1080 degrees down to 270 degrees. Thrustmaster even documents this feature on the support site http://ts.thrustmaster.com/faqs/eng/thr_eng_00155.pdf. This effectively recreates the features racers of the G25 and G27 used in Gran Turismo 5 & 6 for the PlayStation 3.
There was an important note in that support document, “This tip will not function properly in some games (such as GRAN TURISMO®) which adjust or modify the angle of rotation at startup or the restart of each race, according to the type of car being used.” That statement is true with GT Sport. Every time the game is in control of your car (auto-drive in the pits, rolling starts, pausing/unpausing the game, etc.) Gran Turismo Sport will reset the T300 RS’s max rotation back to 900 degrees in most cases. Once you are in control of the car you can use the button combinations to reset the rotation setting.
That is the important tip to remember. When you are in control the of the car you can change the T300 TS max rotation using the MODE button combinations and it will not change until the next time the game take control.
I ran into an issue recently while trying to do some cleanup on a Ruckus SmartZone wireless controller. We migrated to new AD servers, which also doubled as DNS servers and included assigning new IP addresses to our controllers. All devices on our network with static IP settings needed to be updated. Servers and switching hardware weren’t difficult because we could script the change. Our Ruckus APs were more challenging. With 400+ APs to touch, making the change by hand wasn’t practical. There had to be a way to script the change. No problem. The Ruckus SmartZone controller had an SSH interface. It was pretty easy to get into settings of an AP config, so I could just change the DNS settings, right?
Or Not. It turns out you can’t just change the IP settings of an AP on the SmartZone controller. You can swap from static to DHCP and back, but that results in two reboots of the AP as it reads the config changes. There had to be another way.
I opened a ticket with Ruckus support to see if they had any suggestions. One option proposed was to use the “remote ap-cli” command to set the DNS settings directly on the APs themselves rather than in the config on the controller. Was that a solution? Yes, but if that APs were ever to reset, they would get the old settings from the controller. There had to be another way.
I then talked to our Ruckus Systems Engineer about the problem. He suggested I look at the SmartZone API. The API did have a command to change the IP settings, so I set out figuring out how to use it.
Now, I am not a developer or programmer. My official code learning stopped at VB.Net in 2005, but I’ve been using PowerShell for years to perform Windows and Active Directory management. From a talk I watched by Jeffery Snover (father of PowerShell), I know there are two useful functions I can use to talk with web-based APIs: Invoke-WebRequest & Invoke-RestMethod. Invoke-WebRequest can be used to get a session cookie needed to execute other API commands. Invoke-RestMethod is very similar to Invoke-WebRequest but can automatically parse JSON or XML data and turn them into PSObjects. With that knowledge in hand, I got started.
First, I had to get a web session.
$uri = "https://:8443/wsg/api/public"
$logonuri = $uri+"/v8_1/session"

$headers = New-Object "System.Collections.Generic.Dictionary[[String],[String]]"
$headers.Add("Content-Type", "application/json;charset=UTF-8")

#logon
$body = @{"username"="admin";
    "password"="";
    "timeZoneUtcOffset"="-05:00"
    }

$json = $body | ConvertTo-Json


###Requesting a web sessions and adding the cookie to the header file doesn't work in Windows PowerShell 5.1
###Instead HTTPWebRequest from .NET has to be used and pass that session to all the subsequent PowerShell commands.
$webrequest = Invoke-WebRequest -Uri $logonuri -Headers $headers -Body $json -Method Post -SessionVariable websession
Next, I retrieved a list of all the APs managed by the controller. By default, the command paged the result to 100 items at a time, but I could easily loop to capture all the APs.
###Get all the APs on the controller###
$index = 0
$aps = @()
$apsuri = $uri+"/v8_1/aps?index=$index"

do {
    $response = Invoke-RestMethod -Method Get -Uri $apsuri -WebSession
    $websession -Headers $headers
    $aps += $response.list
    $index += 100
    $apsuri = $uri+"/v8_1/aps?index=$index"
} while ($response.hasMore)
Now all I had to do was retrieve the IP settings of each AP, create a JSON object with the new IP settings, and PATCH is back to the controller
That’s it. In a matter of fewer than 60 seconds, I was able to update the DNS settings on all the APs managed by our Ruckus Smartzone controller. This was just the start of what is possible through the Smartzone API. If I only wanted to modify APs in a specific zone, I could narrow the AP retrieval down by performing something like this.
###Get all the APs of a zone###
...
$apsuri = $uri+"/v8_1/aps?index=$index&zoneId=<INSERT ZONE ID HERE>"
...
I’ve been playing Gran Turismo Sport since it launched in 2017. One of the new features that Polyphony Digital added to the series was the ability to create and share decals and liveries for cars, helmets, and race suits. Car customization is not new in racing games; the Forza series was doing this in the Xbox 360 generation, and I remember Top Gear Rally for the Nintendo 64 gave players the ability to customize the paint scheme of the cars. It’s cool to see some of the content players are uploading to Gran Turismo and even cooler that you can download the liveries/decals and apply them to your own vehicles.
However, there is one fatal flaw with GT Sport with the community content: the search is TERRIBLE. I think the search shows “popular content” (like the top 100 overall) then you apply filters to that list. When you show “by date” the date range is only 3-7 days at a time. There’s no way to search for a specific livery across the years of content.
Thankfully, M_Anony from the GT Planet forums created a search engine for the content and it… is… great.
The features are bare with only a search box to type in your search term and a drop-down to pick a specific car. Ultimately, what more do you need? M_Anony also has search engines for decals, helmets, race suites, and replays.
Recently I purchased an Audio-Technica AT2020USB+ microphone to replace my old Plantronics GameCom Pro 1 headset from 2005. I splurged and spent the extra $50 to get the streaming pack, which included headphones and a boom.
The microphone and headphones are great, but it turns out the microphone boom is not the highest quality. The springs pop and creak when the boom moves around. You’re not supposed to rotate the boom around in the desk mount. The biggest issue, however, is a carriage bolt and nylon lock nut clamps the microphone mounting stud to the boom. If you twist the stud up/down enough times, that nut loosens, and the mounting stud falls. The only way to tighten lock nut is to grab and wrench.
The nylon lock nut will eventually loosen if you move the stud up/down
Here is a quick fix for the lock nut issue, and it cost less than $1. Go to the hardware store and purchase an M4 wing nut. My local Lowe’s and Home Depot both had these wing nuts in stock located in the special hardware section. If the nut starts to loosen, then you can reach up and twist the wing nut instead of grabbing a wrench.
Recently at work, we upgraded the top-of-rack switches in our datacenter from Dell S4810 to Dell S5048F-ON. The process was supposed to be simple. Both switches ran Dell Networking OS 9 (a rebrand of Force10), and we mirrored to port, port-channel, and VLAN configurations exactly.
Things went well for 2 hours of the process. All the 1/10Gb DACs and fiber transceivers moved to the S5048 switches and worked with no problem. The problem we ran into centered around the 40Gb transceivers. We used QSFP+ SR units from Dell and assumed they be plug and play in the S5048’s 100Gb QSFP28 ports. Surprise, they didn’t. Well, they did, but we had to make a config change. After an hour of troubleshooting, we discovered the command we needed, AND it was well documented. If only we had read the manual…
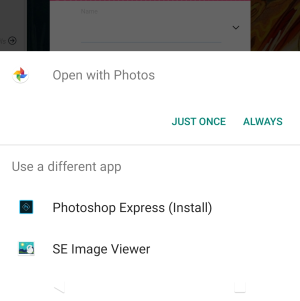
Adobe appears to be taking a page from the Microsoft playbook. Recently I went open a photo on my Android phone and was prompted to choose a default app. In the list was an option I hadn’t seen before, “Photoshop Express (Install).” Where did this come from? It turns out the choice came from Adobe Acrobat Reader. I was using Acrobat Reader with PDFs from work. A recent update to the apps must have slid this “feature” onto the phone. Opening the Share menu from an image also showed “Adobe Scan (Install)”.
In 2019, if you remember, Microsoft did the very same thing sparking a lot of backlash. Let’s hope Adobe gets the message and removes this quickly.
I have Acrobat Reader version 20.3.0.12688 installed for reference.
Hello there and welcome back. As you can see, it has been a very long time since I touched Look Another Blog. All the common factors applied as to why: lack of motivation, lack of content, life, death, etc. But, I’m back and planning to devote more time to the site so the web crawlers to ingest. Maybe a human will visit now and then.
This isn’t a spur of the moment idea either. In September 2019 I attended DerbyCon, an Information Security conference. One of the talks I sat through was by Jason Blanchard called “How to Give the Gift That Keeps on Giving – Your Knowledge”. Jason gave simple ideas on how to get your knowledge out there and I recommend anybody whose afraid to write blog posts or upload YouTube videos go watch the session at https://youtu.be/Xnf8y9u-wh4 (the audio is a messed up, but bear with it).
For the past 8 months I’ve slowly, very slowly, been working on ideas I could write up and share on Look Another Blog. I’ve got 20ish posts planned out with more to come. Some of the posts will be simple stuff like I’ve written about in the past, while others will be technical as they are things I’ve done in my professional life.
So, sit back, strap in, and let’s see where this ride takes us.
Hey look, Lookanotherblog is on new hosting. Can’t tell a
difference? Exactly. Well, except for the shinny pad lock icon in your
address bar. I decided it was time to finally jump ship from GoDaddy
after 7 years. Everybody loves to hate on GoDaddy since it is one of the
largest web hosting services on the Internet. There’s also arguments
they are anti-competitive when trying to leave. I never had major issues
with their services and getting my domain unlocked and moved over to
Namecheap.com was painless.
For hosting I’m on HawkHost.com. There were two big draws to this
fairly new hosting service. 1. Support for Let’s Encrypt. 2. Unlimited
domains/databases/bandwidth for their basic shared hosting package. Now I
can run the site under the root domain and my TT-RSS instance under its
own subdomain.